Battered and Bruised

Ah… The sense of accomplishment from finishing a project. It feels so good to finish something, no? Just last weekend I finished up three model kits and it’s nice to have them out of the way. Now I can start working on some of the others I have sitting on the shelf.

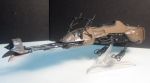
I doubt anyone with an internet connection fails to recognize what this is a model of but it’s just bad form to not introduce the subject. The MPC Imperial Speederbike kit! This kit was originally manufactured in 1983 and has been re-issued numerous times since then. A unique kit due to the rather large scale of the subject. It’s definitely a piece I feel some nostalgia towards, since I had built one of the original ’83 releases.

I picked this kit up at Chillerfest for $25 new in the cellophane from the vendor Digital Realm Models. That guy always has some nice vintage kits and is reasonable with his pricing. $25 is more than I typically spend on kits, but I am willing to splurge a little at Chillerfest.

About the kit, it has a fair amount of detail and required little flash clean-up and barely any filling of gaps. It’s a real simple kit to put together and get a clean, nice model. I realized this going into the build, so I knew I had to make my life more difficult. I wanted to go with a battle dammaged/used look. It’s Star Wars, everything in Star Wars is used and abused. Using some of the techniques listed on StarWarsModels.com, I formulated an action plan and went to work.

The Build. With a quick coat or primer on the basic kit, I sprayed on a thin coat of silver paint. Then I took some rubber cement and dabbed on the spots that would typically receive wear and tear. After the cement dried, I brushed on some Tamiya brown in several thin coats. After the paint dried, I rubbed off the cement (making several awesome glue boogers). I think the technique went well. It could use some refinement. But, I prefer to perform my experiments in real time and take my chances. I do like the look but I will admit, the paint chipping is too large for the scale. For the biker scout, I’m a bit disappointed. The weathering techniques on the figure aren’t that great. Maybe one day I’ll strip and re-do him. But for now, he is fine.

Overall, it was a fun and fast build. I picked it up at the end of April ’12 and finished it in early August ’12. Between this and three other kits, started at the same time, (plus building a new website and a half dozen for fun art projects) I really tore through the model builds this summer.

What am I working on now?

Hey! I don’t have enough time for a full update on what is on the work bench, but I’m going to post a quick gallery of what’s under construction.

Hey folks. Here’s what’s in the bench. The bastard of all models, a Shelby Cobra, Batmobile and an Imperial Speeder bike.

Whys the Cobra a bastard? He didn’t start that way. Originally he was a pre-constructed model my wife found at the flea market for $2. It wasn’t a bad build, it looked like a decent teenager build from a couple of decades ago. It was painted and only missing a few small items and one big item, the windshield frame. The glass for the windscreen was still there, broken in half, but I figure it would make a good template

Since the day I got it home I started stripping it and put it aside. I finally started it in April and at first it went so well. I practiced detailing the motor, building the stacks for the induction system, running wires and fuel lines, wiring up the distributor and creating a more faithful accessory dress for the front of the motor. Then I painted the body. It came out alright, but in the process of rubbing it out I rubbed through the clear. So, stripped the paint against, reprinted it. Then in the process of moving it, I dropped it. The nice thing about using super glue, it falls apart instead of breaking. After putting it back together, I was fixing the axle and applied too much pressure and the entire rear axel assembly exploded.

Anyway, it’s gotta go back together. Oh well.

Maxmillian, from Disney’s the Black Hole

Max
Maxmillain, from Walt Disney’s the Black Hole

Let’s get ready to BUILLLLLLLLLLLLLLLLDDDDDDDDDD!!!!!!!!!!!!!!!!!

Ok, it’s really not that exciting for you. But for me, different story.
The History

If you remember way back in 1978 or ’79, Disney put out a serious attempt at a sci-fi movie, The Black Hole. Most of you won’t remember, it was pretty much DOA, but I loved that movie as a kid. Specifically this guy, the evil robot minion of Dr. Hans Reinhart, Maxmillian! He hovered, looked like a demon and used his spinning claw to rip through someones chest. This guy struck fear into my young soul.
Why?

Despite Max’s penchant for murder, he was a key figure in the merchandising of this movie. Action figures, models, plastered on the cover of coloring books, comics, etc.. I did have quite a few of those items, in particular, this model kit. While the kit was pretty simple, had a low parts count, pre-molded in deep, blood red, and was cheap (about $4 at an early 80’s Kmart), it was a brilliant likeness, far better than the 3 3/4″ action figure. At 11″ tall, it was quite large and it made for a great toy, the arms and head moved and swiveled. Alas, like most of my models, he was built and destroyed. Now he occupies a land fill somewhere.

After getting back into modeling, I quickly became re-acquainted with the series of Black Hole kits. Browsing on Ebay I lusted over the NOS kits. But they were typically out of my low budget price range (a low of $40 to a high of $100) for an Ebay purchase.

So, how did I get this one? Chillefest! There is always someone selling vintage models there and to my surprise, the dude at Digital Realm Models had a new, in cellophane kit. It wasn’t cheap, but whatever, it’s a con and when will I ever come face to with a NIB Max?

The Build 

This build was simple really. But I decided to make it far more complicated. It’s what I do. Gotta try something new on each build! I decided Max needed to have his seems filled, LED lighting and some groovy Alclad chrome paint for his murder gadgets. The filling went as it always does, slow, repetitive and dusty. The LEDs where quite an experience. You would think that would be simple. Nooooo. It was simple, but I over complicated it. But it works. He’s got the glowing red eye. The applying of Alclad for the chrome bits went fantastic. I love that stuff! It’s actually a simple process. Paint your item gloss black, then airbrush on the Alclad with about 12 psi and in a few minutes, shiny. The rest of Max’s paint was pretty simple too. A base coat of Testors deep red, followed by dry brushing on some black and then a couple coats of clear.

The End

That’s really all there is to Max. He’s awesome. Not a show winner, but some modeling progress and skills have been made and learned. I learned about LEDs, chrome paints, more airbrush time, custom made a base… Alright I’m wrapping up. It’s starting to sound like the end of an episode of ___________(insert name of educational children’s show).

Create a free website or blog at WordPress.com.

Up ↑